Sunday, December 25, 2011
Okay seriously...
I made this blog so I could share my crafts with anyone who wants to see them and I have not done a good job keeping it up. I have done several projects since creating this blog, and I plan to show pics and write up mini descriptions about them. That's all for now.
Tuesday, October 4, 2011
Random pieces around the house
P and I both got the new Motorola DROID Bionic and I downloaded the blogger app to see what i could do with it. I think i can take pics directly from the posting. Let's try it out.


Tuesday, August 23, 2011
New To You Music
So I wanted to share with you folks one way you can get ahold of some new music for your iPod or whichever or whatever MP3 player you use.
You may have seen my earlier post about thrifting bed sheets for fabric yardage. Well this is the same concept. When you are at Goodwill, go to the CDs and just check out what's there. Most of them are only $2.99. I have picked up a few great finds this way, just make sure you check inside the case. I wanted a Daughtry CD a few weeks ago but when I opened it it had the Saturday Night Fever soundtrack inside. Bummer. You might even find something you've never heard of but the song titles sound cool. Good way to hear new to you music. Today I found what I believe has to be so far my best Goodwill CD find. Not all my friends and family know this but I really like listening to music in foreign languages...mostly German. I have discovered an 80's German Pop Rock band called Munchener Freiheit. Here is a link to their Wikipedia. If you have seen the movie Say Anything... then you may remember the song Keeping the Dream Alive.

You may have seen my earlier post about thrifting bed sheets for fabric yardage. Well this is the same concept. When you are at Goodwill, go to the CDs and just check out what's there. Most of them are only $2.99. I have picked up a few great finds this way, just make sure you check inside the case. I wanted a Daughtry CD a few weeks ago but when I opened it it had the Saturday Night Fever soundtrack inside. Bummer. You might even find something you've never heard of but the song titles sound cool. Good way to hear new to you music. Today I found what I believe has to be so far my best Goodwill CD find. Not all my friends and family know this but I really like listening to music in foreign languages...mostly German. I have discovered an 80's German Pop Rock band called Munchener Freiheit. Here is a link to their Wikipedia. If you have seen the movie Say Anything... then you may remember the song Keeping the Dream Alive.
So that is a way to get new to you music. I hope next time you go to Goodwill you will check out the CD rack and just see what you can find. You never know what can be in there.
Ashley Holland 8/23/2011
Friday, July 1, 2011
Another NBY Garden Update!
Ok, so when I sent out on this gardening adventure I had no idea I'd be so successful!!! Here are the pictures.....
![]()
![]()
![]()
![]()
![]()
![]()


These two actually sprouted off of the first one that bloomed. That one has been removed and is currently drying out and will become delicious sunflower seeds in a few days.

This one's almost as tall as the fence!
This one just shows the whole garden.
See that little watermelon in there?

Here's the other watermelon.
Wow! Gardening is so fun! I love to go out back every morning and check out the progress of my garden, and enjoy the sounds of the birds and the clouds going by and all that fun nature-y stuff. I'll be posting an update on the seeds really soon. Thanks for stopping by. I hope you have enjoyed the pictures of my No Back Yard Garden.
Keep coming back for more Craft Tastic fun with Ash!
Ashley Holland 7/1/2011
Friday, June 10, 2011
Update on NBY Garden
Alright, so it's been a few weeks now and...well here's what it looks like now.


The Mammoth Sunflower in the very middle, has gotten to be about 2 feet tall now.

Here it is getting ready to bloom

Starting to bloom now....

It's bloomed!
I'm so EXCITED!!!! The garden is doing great! I forgot to mention the watermelons are also growing nicely. No actual watermelons yet, update on those later.
Ashley Holland 6/10/2011
Polymer Covered Bottles
Wow! It wasn't until I was actually bringing these downstairs to photograph them that I realized how OLD they are. The following pics are of some coins jars I made out of upcycled Starbucks Frappuccino bottles. I made these in 2004. Like I said....OLD! Here they are:


Quarters

Dimes

Nickels.
By the time I got to this one, I felt like making it look like something. For some reason mint chocolate chip ice cream came to mind.

Pennies.

This one is the first one I made. Before I got the idea to make coins jars.

This one I made for Preston as a house warming gift when he moved into the Cumberland a few years ago. It had some bamboo in it but they died. :(
Well I am most certainly enjoying getting to share my projects. I have to admit I have not done anything recently except for a painting that Preston says I should call Ketchup and Mustard (in a French accent). Haha! I might show a pic of that in a later post. If I decide not to spray paint over it.
Ashley Holland 6/10/2011
Polymer Pastries
Hey Folks!
Today I was sick and left work early. I have pretty much been sitting here at the house all day catching up on my re-runs of Beverly Hills, 90210.
Anyway, I was going through some pics and found this one of the polymer pastries I made for my fellow Starbucks partners a couple of Christmases ago. I asked everyone what their favorite pastry was and made each of them a Christmas ornament. I had a fun time making them.

Polymer clay is so fun and easy to work with. Just writing this blog has inspired me to go and photograph other polymer projects I've done. I'll post them soon.
Ashley Holland 6/10/2011
Thursday, May 12, 2011
The "No Back Yard" Garden Photo Tutorial
Thank you all for your patience as it has taken me a while to get all of the supplies I needed for this project.
The supplies you will need are:
kiddie pool
drill with 1/2'' hole cutter bit
pavers or wood blocks to elevate
small to medium size rocks (40 lb bag)
dirt (potting soil)
plants
water hose
On to the photo tutorial:
First you need to get a kiddie pool from Wally World.....


The supplies you will need are:
kiddie pool
drill with 1/2'' hole cutter bit
pavers or wood blocks to elevate
small to medium size rocks (40 lb bag)
dirt (potting soil)
plants
water hose
On to the photo tutorial:
First you need to get a kiddie pool from Wally World.....

Then you need to drill some holes. I used our 1/2 inch hole cutter drill bit.
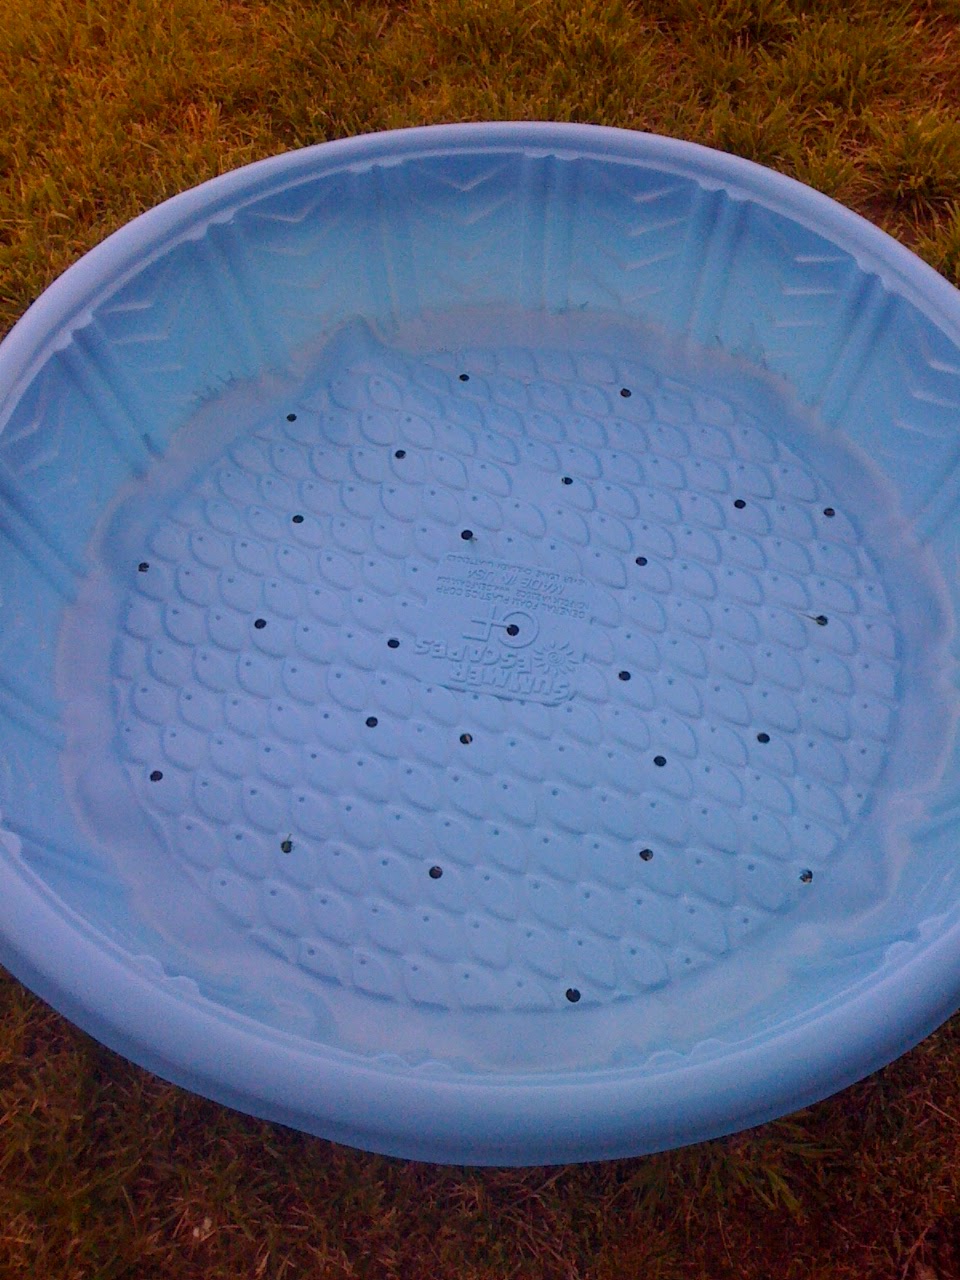
Be sure to use safety glasses!

Ok, now you that you have drilled the holes you need to elevate your kiddie pool so it will drain properly. Preston and I chose to use these 59 cent pavers we found at the Home Depot.

Close up of the elevation....

Ok now that you did that it's time time to get some rocks. I found this 40 pound bag of river pebbles at the Home Depot for only $3.65 pre tax. Place a layer of rocks on the bottom of the kiddie pool. It will sag in some areas, this is ok. The rocks will help with drainage.

Now put some dirt over the rocks....

Keep spreading dirt over the rocks until the kiddie pool is pretty full of dirt.

Now get your plants. In March Preston and I started some watermelon and sunflowers indoors. It's time to move them outside to our garden.....

Now just gently scoop out the plants from under the original dirt and transplant into your "NBY" garden.

Make sure you keep it watered especially on hot summer days.
I hope you had fun learning how to make a garden for your back porch. Hopefully within a few months we will have a couple of giant sunflowers and some awesome watermelons!!!
Ashley Holland 5/12/2011
Saturday, May 7, 2011
Cute Handmade Drawstring Bags
These drawstring bags are so fun and easy to make. You can use them for just about anything; like loose change in your purse, earbuds, or lip gloss. One of my friends that I gave one to is using hers for her sunglasses. I'm doing them in all sizes, and all sorts of fabric designs. Here is just one example of the bags I've made so far.


Oh and check out the cute dog in that photo. That would be my adorably sweet little sister, Darby.
Ashley Holland 5/7/2011
Coming Soon: The "No Back Yard" Garden
Learn how to plant a garden when all you have is a porch.
Preston and I bought a townhome a little over a year ago, and all we have out back is a concrete slab. This Spring we decided to start a garden, however.....our Homeowners Association doesn't allow us to plant anything in the grass, or flower beds. So with a little advice from my green thumbed stepdad, I have a plan in place to build the perfect porch garden. Stay tuned for the "NBY" Garden photo tutorial.
Ashley Holland 5/7/2011
Wednesday, May 4, 2011
Thrifted Muppet Treasure Island Fitted Sheet
So I have been watching tons of video tutorials by Whitney Edwards on her youtube.com channel aglanceatmyworld aka Whitney Sews. Anyway, she does alot of things out of thrifted vintage sheets, so I recently picked some up at my local Goodwill store. I found a twin size Muppet Treasure Island fitted sheet, and before I do anything with it I'd like to find out first of all, if it is a collector's item someone might want, and if so I will leave it intact. And/or how to take out the elastic without wasting much of the fabric itself. I have googled myself into a corner and can't find a single thing about this sheet online....anywhere. Not even google images or even on a Muppet collector's item website. Anyway should anyone who sees this know anything about it, please let me know. Otherwise I'll give an update in the very near future.


5/4/2011 Ashley Holland


5/4/2011 Ashley Holland
Subscribe to:
Comments (Atom)